Booting from External Storage
The Omega comes with enough flash storage to get started and working on projects, but if you need more it’s possible to extend the storage capacity using a USB drive or MicroSD card!
This article will explain and outline the procedure for the pivot-overlay process. Basically we move the writeable portion of the Omega’s firmware to an external storage device such as a MicroSD card or USB drive. Then we expand the Omega’s filesystem to use the entire storage device.
We’ll cover how to:
- Format a USB drive or MicroSD card using the Omega
- Mount the external storage device in the Omega’s filesystem
- Move the writeable portion of the filesystem to the storage device
- Set it up to mount the filesystem from the storage device on boot
Warnings
Before you proceed, you’ll need to be aware of the following warnings. This is a process that modifies how the Omega stores its files and any user files or programs you’ve added to the Omega may possibly be deleted. Make sure you back them up before proceeding!
Firmware Updates
Updating or reflashing the firmware will undo the pivot-overlay process:
- The filesystem will be reverted to a fresh state and all user-created files will be deleted.
- The filesystem will return to residing only on the Omega’s onboard flash storage.
Booting Without the Storage Device Connected
Caution: If you power on the Omega without the storage device connected, the following will be unavailable or reset to default as they would have only been stored on the device:
- User-created files
- User-installed packages (eg. Python, Git)
- Settings for system software or packages
The filesystem will only boot into a “fresh” state with only the default files and folders available. However, all of the above items will be accessible again once you reboot the Omega with the storage device connected!
The pivot-overlay Procedure
The pivot-overlay procedure allows you to download, store, and install software and packages onto another storage device like an SD card or USB drive. The storage can be as big or small as you need, so you’ll (probably) never have to worry about running out of space again!
Here’s how it works. The Omega’s filesystem is comprised of two main parts:
/rom- Contains the base, read-only part of the firmware/overlay- Contains changes to the base firmware, such as when you modify files or install packages
When the Omega boots, it combines the contents of both to create the entire filesystem, /. This is where you can access your folders such as /root, /etc, and /bin.
pivot-overlay moves the /overlay part to the external storage device, allowing for as much space as you can give it!
Requirements
You will need:
- A USB drive or MicroSD card with however much memory you need
- Only the Omega2+ can use MicroSD cards. Read our MicroSD card guide for full details.
- A Dock with a USB host port if using a USB drive
- Firmware >= 0.1.9 b149
Before you begin, you can see for yourself how much space is being used on your filesystem via the df command. Run this in your Omega’s terminal:
df -hOn a freshly-flashed Omega2, you should get something like this:
Filesystem                Size      Used Available Use% Mounted on
/dev/root                 5.5M      5.5M         0 100% /rom
tmpfs                    29.7M    192.0K     29.5M   1% /tmp
/dev/mtdblock6            9.1M      2.3M      6.8M  26% /overlay
overlayfs:/overlay        9.1M      2.3M      6.8M  26% /
tmpfs                   512.0K         0    512.0K   0% /dev
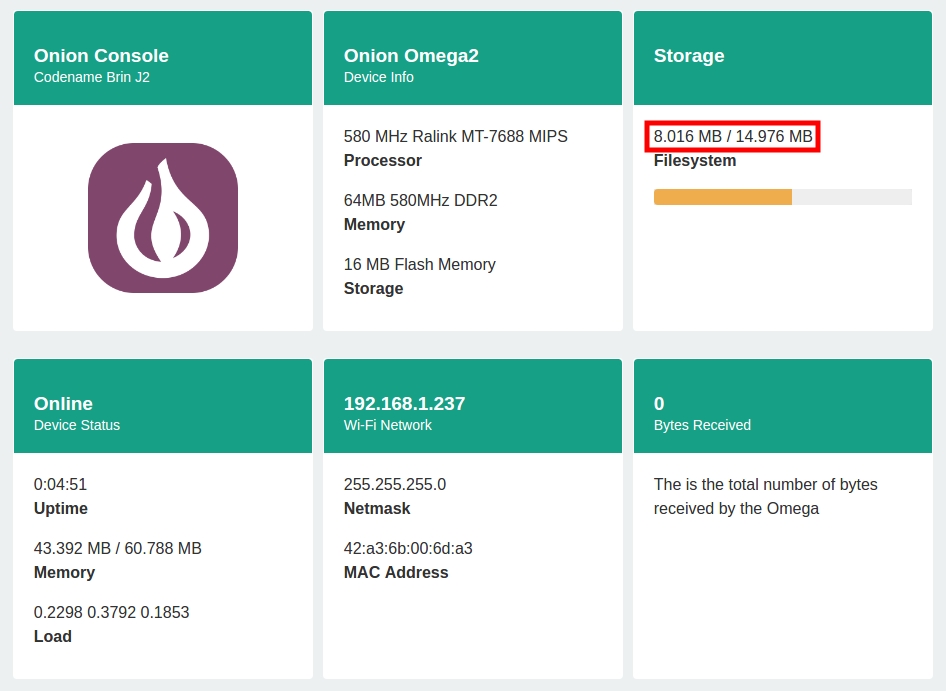
Here we have about 14.6 MB of space total on the Omega’s flash, which is the sum of:
/overlay- theoverlayfs:/overlayentry/rom- the/dev/rootentry
This is what it looks like in the Console. The decimals in the previous example are rounded and may be slightly different from the Console’s calculations.

Now let’s get started on preparing the external storage device.
Format Your Storage Device to ext4
For pivot-overlay to work properly, you will need a storage device formatted to the ext4 filesystem.
If you already have an
ext4formatted storage device , you can skip this part and continue to the next step: Mounting the External Storage Device.
If you don’t have one that’s formatted, you can format it using the Omega.
Warning: Formatting will erase all data on your USB drive. If you’re reusing an old drive, make sure to back up your data before continuing!
Installing the Tools
Since USB Kernel modules are pre-installed, on your Omega, install a filesystem tool by running the following commands:
opkg update
opkg install e2fsprogs
Connecting External Storage Device
Insert or connect your storage device to the Omega and it will be automounted for file input/output. This blocks us from formatting it, so we’ll need to unmount it first.
By default, devices with a single partition are mounted to the following locations:
- USB:
/tmp/mounts/USB-A1 - MicroSD:
/tmp/mounts/SD-P1
Devices with multiple partitions may have multiple entries such as USB-A2, SD-P3, and so on. Choose the name of the partition that you want to use and continue below.
Unmount the target device by running the following command, replacing <mount path> with one of the paths above:
umount <mount path>The Omega should now be ready to format the device.
Formatting the Device
Now we need to find the name under which our device is listed in /dev. By default, devices with a single partition are listed as follows:
- USB:
sda1 - MicroSD:
mmcblk0p1
Devices with multiple partitions may have multiple entries such as sda2, mmcblk0p3, and so on. Choose the name of the partition that you want to use and continue below.
Run the following command and fill in your device’s name corresponding to one of the examples above:
mkfs.ext4 /dev/<device name>It may warn you that the device contains a file system. Enter y to proceed.
For a USB drive, the process should look something like this:
root@Omega-7ADD:/tmp/mounts# mkfs.ext4 /dev/sda1
mke2fs 1.43.3 (04-Sep-2016)
/dev/sda1 contains a vfat file system
Proceed anyway? (y,n) y
Creating filesystem with 3784448 4k blocks and 946560 inodes
Filesystem UUID: f5ca350a-d8e2-4334-8aa2-ee17d623c444
Superblock backups stored on blocks:
        32768, 98304, 163840, 229376, 294912, 819200, 884736, 1605632, 2654208

Allocating group tables: done
Writing inode tables: done
Creating journal (16384 blocks): done
Writing superblocks and filesystem accounting information: done
Mounting the External Storage Device
If you did not need to use the Omega to format your storage device, make sure the device is now connected to the Omega.

Run the following commands and fill in <device name> with your device’s name (eg. sda1).
mkdir /mnt/<device name>
mount /dev/<device name> /mnt/
Duplicating the /overlay Directory
Move the /overlay directory into the storage device that we just mounted by running the following command:
mount /dev/<device name> /mnt/ ; tar -C /overlay -cvf - . | tar -C /mnt/ -xf - ; umount /mnt/Automatically Mount /overlay on Startup
First install block-mount:
opkg update
opkg install block-mount
Now generate the device’s fstab entry using block-mount:
block detect > /etc/config/fstabThen edit the /etc/config/fstab file to enable auto-mounting the /overlay directory:
vi /etc/config/fstabLook for the line
option target '/mnt/<device name>'and change it to:
option target '/overlay'Then, look for the line:
option enabled '0'and change it to
option enabled '1'If your USB device uses one of the drivers from
kmod-usb-storage-extras, you will need to run the following:ln -s /etc/modules.d/usb-storage-extras /etc/modules-boot.d/usb-storage-extras
Save the file and restart the Omega:
rebootVerify The New Filesystem
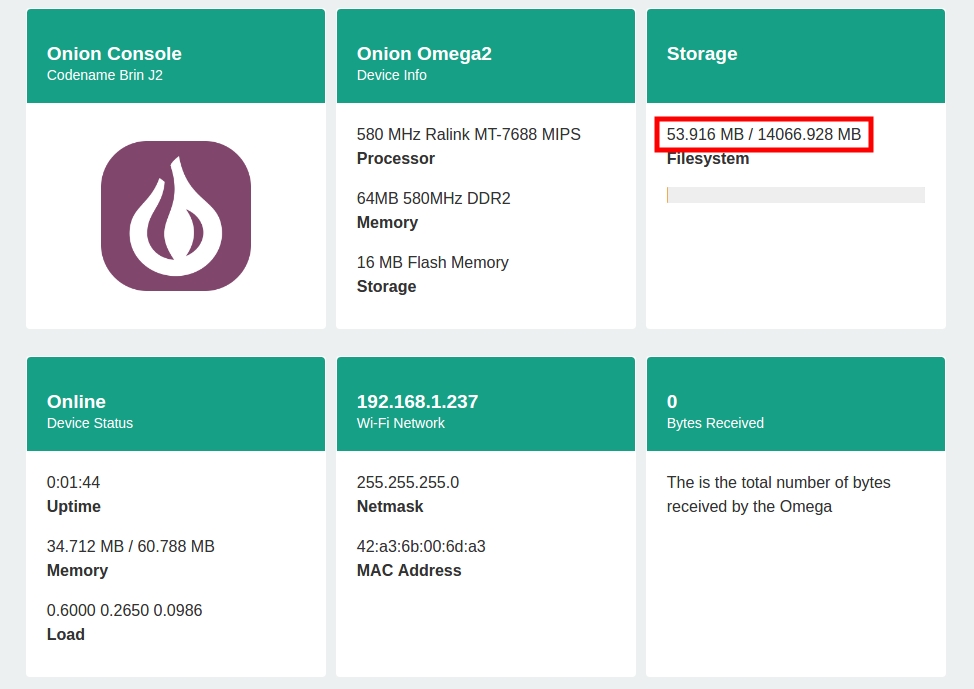
And voilà! Your Omega should automatically mount the /overlay directory. From this point on, all changes to your filesystem will be made on your storage device, and you’ve increased your Omega’s storage by about a hundred times over! Great job!
When you run df -h again, this is what it should look like with a 16 GB USB drive:
Filesystem                Size      Used Available Use% Mounted on
/dev/root                 5.5M      5.5M         0 100% /rom
tmpfs                    29.7M    196.0K     29.5M   1% /tmp
/dev/sda1                14.1G     46.7M     13.4G   0% /overlay
overlayfs:/overlay       14.1G     46.7M     13.4G   0% /
tmpfs                   512.0K         0    512.0K   0% /dev
/dev/sda1                14.1G     46.7M     13.4G   0% /tmp/run/mountd/sda1
Here’s what it looks like in the Console.
