Using the RFID & NFC Expansion
The NFC & RFID Expansion brings contact-less RFID and NFC communication to the Omega ecosystem. It supports reading and writing with several NDC and RFID protocols at 13.56 MHz. The Expansion is based on the popular PN532 NFC Chip and communicates with the Omega via UART1.
Supported Card Types
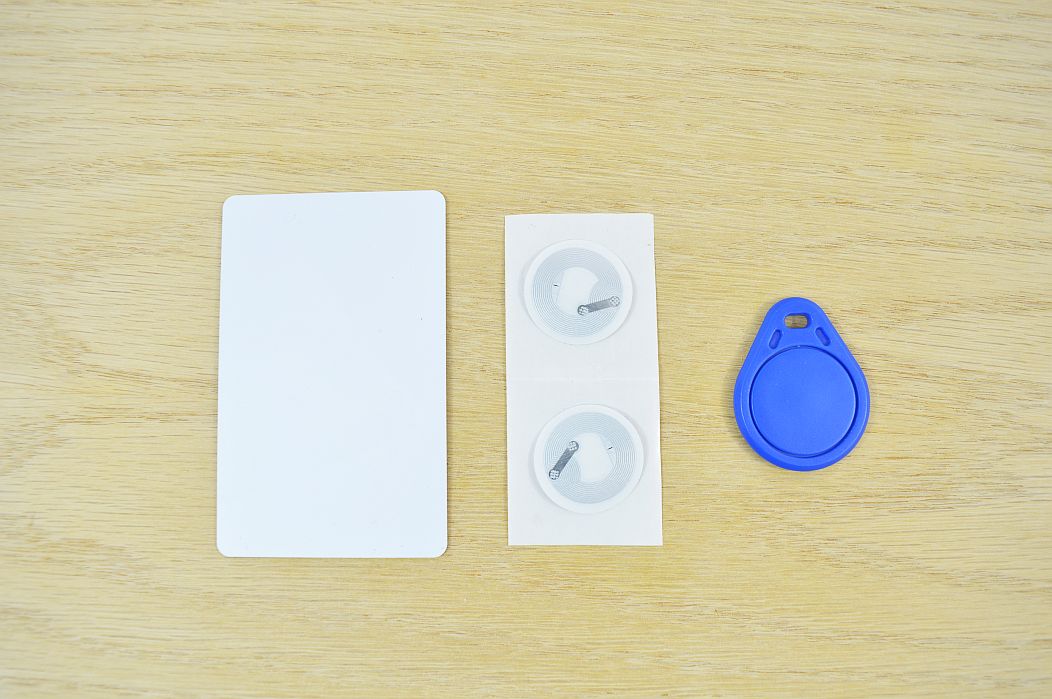
The RFID/NFC Expansion comes with two Mifare Ultralight tags that you can scan, read and write. However, you can also use other RFID/NFC tags that are compatible with an Expansion. Here are the list of others:
- Mifare 1k, 4k, Ultralight and DesFire cards
- ISO/IEC 14443-4 cards such as CD97BX, CD light, DesFire, P5CN072 (SMX)
- Innovision Jewel cards such as IRT5001 card
- FeliCa cards such as RCS_860 and RCS_854
We’ll be covering how to use Mifare Classic and Ultralight since they’re the most frequently used tags
Installation
To use your RFID & NFC Expansion, you’ll first need to initialize the device:
opkg update
opkg install nfc-exp
This will install the nfc-utils package, which contains several command line programs based on the libnfc library for interacting with NFC devices.
See the libnfc wiki for more info.
Available Commands
Once nfc-exp has been installed, the following utilities will be available:
nfc-emulate-forum-tag4
nfc-jewel
nfc-list
nfc-mfclassic
nfc-mfultralight
nfc-read-forum-tag3
nfc-relay-picc
nfc-scan-device
There are also few packages that are dedicated to Mifare tags:
mifare-classic-format
mifare-classic-read-ndef
mifare-classic-write-ndef
mifare-desfire-access
mifare-desfire-create-ndef
mifare-desfire-ev1-configure-ats
mifare-desfire-ev1-configure-default-key
mifare-desfire-ev1-configure-random-uid
mifare-desfire-format
mifare-desfire-info
mifare-desfire-read-ndef
mifare-desfire-write-ndef
mifare-ultralight-info
These programs can be accessed from the command line and are used to control the RFID & NFC Expansion. For a print-out of the command’s usage, run it with just an ‘-h’ argument.
Using Mifare Ultralight Cards
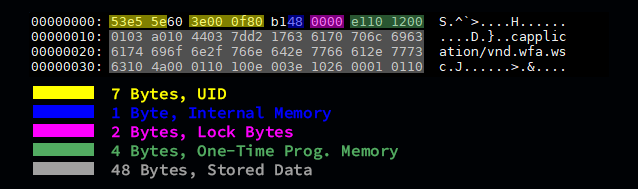
Mifare Ultralight Cards are very useful for high volume applications. They are loaded with 64 Bytes of EEPROM Memory, including 4 bytes of One Time Programmable Memory where the individual bits can be written but not erased and 48 Bytes of User Defined Data. Ultralight cards can be also set to “read-only” using Lock-Bytes.
nfc-mfultralight program is used to configure the Mifare Ultralight type cards. You can read from the tag and write to it.
There are several operations that can be done with this program:
* Scan the tag and store it to a binary file (.mfd format)
* Modify the user data
* Write new binary file to the tag
In order to scan the tag and store it to a file, please run the following command:
nfc-mfultralight r mycardUltra.mfdThe card has been read and stored in a file called mycardUltra.mfd. Now, the .mfd binary file has been saved in your filesystem. To view the content of the file, use xxd utility by using the following command:
xxd mycardUltra.mfdAnd you will be presented with the following:
Modifying the Data
To write data to the tag, we’ll modify what we just read, and then write it to the card. To modify the data we will:
- Convert the
.mfdbinary into.hexthat’s easier to edit - Edit the
.hexfile using any code editor (e.g vim, nano, etc) - Convert the hex back to the
.mfdfile
The xxd utility could be used in order to convert the .mfd to .hex:
xxd mycardUltra.mfd > mycardUltra.hexYou can modify any User Data Block (2nd, 3rd and 4th blocks of the sector). Change bytes that you’d like to edit and save it. For example you can do the following:
Block 1: 4920 616d 2075 7369 6e67 2072 6669 642f
Block 2: 6e66 6320 6578 7061 6e73 696f 6e0a 0a0a
Save your modified file and convert it back to the binary .mfd format using the following command:
xxd -r mycardUltra.hex mycardUltra.mfdWriting to the Tag
Now, you can write the updated data to the card. Issue the following command
yes N | nfc-mfultralight w mycardUltra.mfdThe first part of this command will automatically answer No to all questions posted by the utility:
Write OTP bytes ? [yN] Write Lock bytes ? [yN] Write UID bytes (only for special writeable UID cards) ? [yN]And you’ll be presented with the following:
NFC device: Omega NFC Expansion opened
1 ISO14443A passive target(s) found:
        53e55e3e000f80
Using MIFARE Ultralight card with UID: 53e55e3e000f80
Tag is EVI - PASSWORD may be required
EVI storage size: unknown!
Write OTP bytes ? [yN] Write Lock bytes ? [yN] Write UID bytes (only for special writeable UID cards) ? [yN]
If you read the card again, you’ll see that it now holds the data that was just written:
0000000: 53e5 5e60 3e00 0f80 b148 0000 e110 1200  S.^`>....H......
0000010: 4920 616d 2075 7369 6e67 2072 6669 642f  I am using rfid/
0000020: 6e66 6320 6578 7061 6e73 696f 6e0a 0a0a  nfc expansion...
0000030: 6572 65fe 616e 7cfe 003e 1026 0001 0110  ere.an|..>.&....
Using Mifare Classic Cards
Mifare Classic cards are pretty handy, they store up to 4kb of data and usually come in two form-factors:
Mifare Classic cards are loaded with either 1KB or 4K of EEPROM memory.
Each card has its own UID, Block Check Character (BCC), Access Condition with two keys (A and B) and blocks of user data that can be configured with different access condition.
Please see the chart below for characteristics of the cards:
| Card Type | # of Sectors | # of Blocks per Sector | Data (Bytes) |
|---|---|---|---|
| Mifare Classic 1K | 16 | 4 | 1,024 |
| Mifare Classic 4K | 32 + 8 | 4 + 16 | 4,096 |
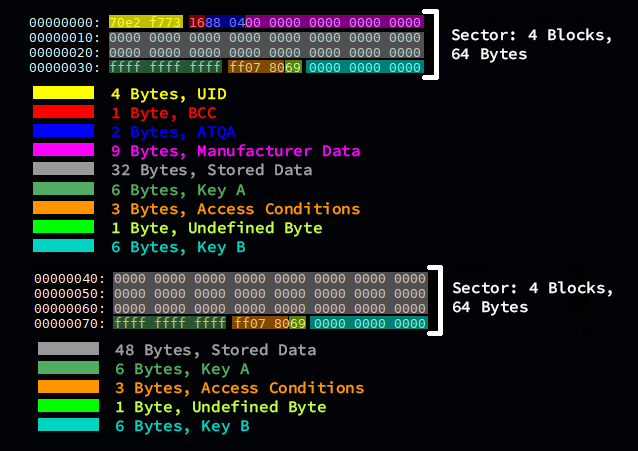
Each Block is 16 bytes. A Sector holds 4 Blocks, so 64 bytes in total. One block in each sector holds the two keys (A and B), as well as the Access Control Settings that define the privileges (read, write, neither, both) each key for that sector.
The very first sector of a tag starts with a block of card identification data that cannot be overwritten, then 2 programmable blocks, and the key block. All the rest of the sectors are made up of 3 programmable blocks and a key block.
We’ll be using the nfc-mfclassic program is used to interact with Mifare Classic cards. You can read from/write to the tag, wipe the card and modify the keys.
There are several operations that can be done with this command:
* Scan the tag and store the contents to a binary file (.mfd format)
* Modify the user data and/or the keys
* Write new binary file to the tag
Reading the Mifare Classic Tag
In order to scan the tag and store it to a file using key A, run the following command:
nfc-mfclassic r a mycard.mfdThe card has been read and then stored in a file called mycard.mfd using key A. Now, the .mfd binary file has been saved in your filesystem. This file is populated with a binary content that is difficult to understand. So we’ll be using the xxd utility to convert it to a more readable hex format.
Using this utility you can view the content of your tag data using the following command:
xxd mycard.mfdAnd you will be presented with the following:
00000000: 70e2 f773 1688 0400 0000 0000 0000 0000  p..s............
00000010: 0000 0000 0000 0000 0000 0000 0000 0000  ................
00000020: 0000 0000 0000 0000 0000 0000 0000 0000  ................
00000030: ffff ffff ffff ff07 8069 0000 0000 0000  .........i......
00000040: 0000 0000 0000 0000 0000 0000 0000 0000  ................
00000050: 0000 0000 0000 0000 0000 0000 0000 0000  ................
00000060: 0000 0000 0000 0000 0000 0000 0000 0000  ................
00000070: ffff ffff ffff ff07 8069 0000 0000 0000  .........i......
00000080: 0000 0000 0000 0000 0000 0000 0000 0000  ................
00000090: 0000 0000 0000 0000 0000 0000 0000 0000  ................
000000a0: 0000 0000 0000 0000 0000 0000 0000 0000  ................
000000b0: ffff ffff ffff ff07 8069 0000 0000 0000  .........i......
...
The first 4 lines represent first Sector. The very first block of that Sector holds the card identification data, including the UID, BCC, and other Manufacturer Data. In this case the UID of this card is 70e2f773, BCC is 16, ATQA is 8804 and the rest is the manufacturer data. Every sector has it’s own Keys and Access points stored at the last block of each sector.
Modifying the Data
To write data to the tag, we’ll modify what we just read, and then write it to the card. To modify the data:
- Convert the
.mfdbinary into.hexthat’s easier to edit - Edit the
.hexfile using any code editor (e.g vim, nano, etc) - Conver the hex back to the
.mfdfile
The xxd utility could be used in order to convert the .mfd to .hex:
xxd mycard.mfd > mycard.hexYou can modify any User Data Block (2nd and 3rd blocks of the first sector, and 1st, 2nd or 3rd block of all other sectors). Change bytes that you’d like to edit and save it. For example you can do the following:
Block 1: 0001 0203 0405 0607 0809 0a0b 0c0d 0e0fSave your modified file and convert it back to the binary .mfd format using the following command:
xxd -r mycard.hex mycard.mfdWriting to the Tag
Now, you can write the updated data back to the card, using key A:
# nfc-mfclassic w a newdata.mfd
NFC reader: pn532_uart:/dev/ttyS1 opened
Found MIFARE Classic card:
ISO/IEC 14443A (106 kbps) target:
    ATQA (SENS_RES): 00  04
       UID (NFCID1): 70  e2  f7  73
      SAK (SEL_RES): 08
Guessing size: seems to be a 1024-byte card
Writing 64 blocks |...............................................................|
Done, 63 of 64 blocks written.
Now the card contains updated data!
Reading NDEF Data
The mifare-classic-read-ndef is the utility to read the card and store it in a NDEF format. In general, NDEF is the abbreviation for NFS Data Exchange Format. That format is used to store and exchange data (e.g. text messages, site’s URLs, passwords, etc) in a plain text format.
Issue the following command:
mifare-classic-read-ndef -y -o readdata.txtIn this command, we are not confirming to read using -y and extracting NDEF message by having -o. If your tag doesn’t have any previously NDEF data written to it then you will be presented with the following ouptut:
Found Mifare Classic 1k with UID 10ebf773.
No MAD detected.
MAD stands for Mifare Application Directory and it indicates the sector that contains NDEF record. If there is no NDEF data written yet, there is nothing to read from. So let’s write something to the card.
Writing NDEF Data to the Tag
In order to write a message to the card, the mifare-classic-write-ndef utility will be used. Here is the procedure of writting:
- Create a file (e.g. file.txt) and populate it with a message (e.g. Hello World!)
- Write this file to the tag
- Check if the data was successfuly written
Assuming that you have created the text file, we’ll use the following command to write the content of that file to the card:
mifare-classic-write-ndef -y -i file.txtIf the file has been successfuly written, you should see the similar output:
NDEF file is 13 bytes long.
Found Mifare Classic 1k with UID 10ebf773.
Lastly, to check if the message is on the card, we’ll read the card to a new file and check the data:
mifare-classic-read-ndef -y -o readfile.txtNow you can see the content of the readfile.txt and compare it to the file.txt.
Formating the Tag NDEF data
In order to format the card data (remove all user data), the mifare-classic-format command will be used. Make sure to save/backup all the data stored on the card if needed as this operation cannot be reverted.
RFID/NFC Expansion Availability
The nfc-scan-device is the utility to check whether the RFID/NFC device is available. When your RFID/NFC Expansion is plugged to the Dock, you can scan it and make sure that it is recognized by the system:
# nfc-scan-device
nfc-scan-device uses libnfc reboot-3483-gd1bcad0
1 NFC device(s) found:
- pn532_uart:/dev/ttyS1:
    pn532_uart:/dev/ttyS1
From this, you can see that the Expansion is up and running under /dev/ttyS1.
Troubleshooting Tips
Sometimes the issued nfc command could not finish its process and if you terminate it using Ctrl + C it will run on the background. If you try to perform other nfc related operations you may face the following error:
error   libnfc.driver.pn532_uart        Serial port already claimed: /dev/ttyS1
nfc-mfultralight: ERROR: Error opening NFC device
That means that the RFID/NFC Expansion is still busy processing previous command. The screen utility will be used to stop it. Issue the following commands to install the screen utility and stop the background process:
opkg update
opkg install screen
screen /dev/ttyS1
You will be presented with the black blank screen. To stop the process, hit Ctrl + a + k and at the following prompt Really kill this window [y/n] hit y. This will stop the process and will allow you to continue the expansion.